使用vue3实现了一款带涟漪效果的组件
在一款手机应用系统中看到一个这么个涟漪的效果,手触摸、点击上去,会跟水波纹一样会扩大效果,让体验更好。如下图所示:
拆开来分析其实就很简单了如下几步:
- 点击在容器(容器超出隐藏)位置创建并定位了一个div圆圈。
- 让这个圆圈已该位置逐渐变大有一个过渡动画效果。
- 支持重复点击生成动画。
- 这个圆的动画范围是当前容器的2倍。
- 动画执行完成后删除动画元素
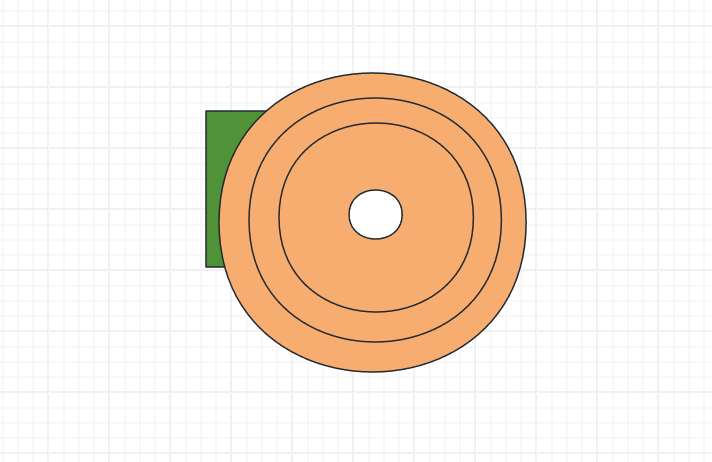
点击位置假如是白色区域,那么就会向外一点点的扩大,直至撑起整个容器(绿色矩形)区域
应该实现原理大家能知晓怎么实现了,那么咱们使用vue来简单实现一个组件
pro-ripple
实现一个创建当前点击、触摸位置的圆圈
先给咱们的
pro-ripple绑定对应的事件
<template>
  <div
    class="pro-ripple"
    @touchstart.passive="touchStartCheck"
    @touchmove.passive="touchMoveCheck"
    @mousedown.passive="startRipple"
  >
    <slot />
    <ProWave
      v-for="ripple in ripples"
      :key="ripple.uuid"
      class="pro-ripple-wave"
      :style="ripple.waveStyles"
      @end="clearWave(ripple.uuid)"
    />
  </div>
</template>

<script>
export default {
  methods: {
    touchMoveCheck() {
      window.clearTimeout(this.touchTimeout)
    },
    touchStartCheck($event) {
      this.touchTimeout = window.setTimeout(() => {
        this.startRipple($event)
      }, 100)
    },
    startRipple($event) {}
  }
}

</script>.passive修饰符简单解释下:
.passive修饰符是如何工作的呢?其实,它是一个非常简单的机制。当浏览器遇到一个带有.passive修饰符的事件处理函数时,它就会在调用该函数之前设置一个标志,表示该函数不会调用event.preventDefault()方法。如果该函数确实调用了event.preventDefault()方法,那么浏览器就会忽略这个调用,并继续执行默认操作。
通过使用
.passive修饰符,你可以优化事件处理的性能,特别是在处理大量事件或需要高性能的场景中。
接下来看看创建一个圈圈的逻辑,其实大家通过上面代码已经能看到了ripples数据追加一条数据:
export default {
  name: 'ProRipple',
  components: {
    ProWave
  },
  props: {
    mdEventTrigger: {
      type: Boolean,
      default: true
    }
  },
  data: () => ({
    ripples: [],
    touchTimeout: null,
    eventType: null
  }),
  methods: {
    touchMoveCheck() {
      window.clearTimeout(this.touchTimeout)
    },
    touchStartCheck($event) {
      this.touchTimeout = window.setTimeout(() => {
        this.startRipple($event)
      }, 100)
    },
    startRipple($event) {
      raf(() => {
        const { eventType } = this

        if (!eventType || eventType === $event.type) {
          const size = this.getSize()
          const position = this.getHitPosition($event, size)

          this.eventType = $event.type
          this.ripples.push({
            waveStyles: this.applyStyles(position, size),
            uuid: uuid()
          })
        }
      })
    },
    applyStyles(position, size) {
      size += 'px'

      return {
        ...position,
        width: size,
        height: size
      }
    },

    clearWave(uuid) {
      uuid ? (this.ripples = this.ripples.filter(ripple => ripple.uuid !== uuid)) : (this.ripples = [])
    },

    getSize() {
      const { offsetWidth, offsetHeight } = this.$el

      return Math.round(Math.max(offsetWidth, offsetHeight))
    },

    getHitPosition($event, elementSize) {
      const rect = this.$el.getBoundingClientRect()
      let top = $event.pageY
      let left = $event.pageX

      if ($event.type === 'touchstart') {
        top = $event.changedTouches[0].pageY
        left = $event.changedTouches[0].pageX
      }

      return {
        top: top - rect.top - elementSize / 2 - document.documentElement.scrollTop + 'px',
        left: left - rect.left - elementSize / 2 - document.documentElement.scrollLeft + 'px'
      }
    }
  }
}使用offsetWidth和offsetHeight获取当前容器的width和height,然后通过getBoundingClientRect()获取到容器的top和left,然后通过点击的位置减去容器的位置,就可以得到点击的相对位置了。`
实现动画效果ProWave组件
动画效果是使用
opacity从0 到 0.25, 和transform从scale(0)到scale(2)做的
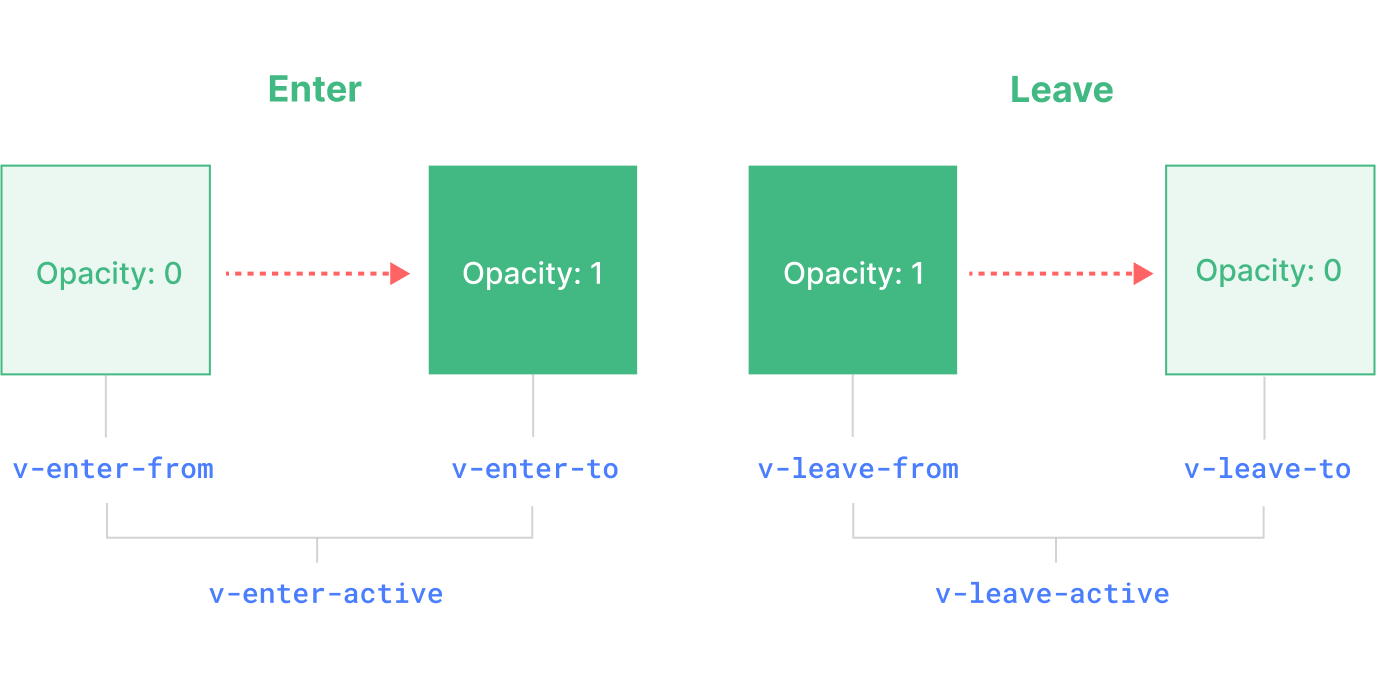
为了实现动画的控制咱们可以直接使用vue内置的transition组件。过程如下(在vue官网取的动画过程图)
ProWave代码如下:
<template>
  <transition name="pro-ripple" @after-enter="end">
    <span v-if="animating" />
  </transition>
</template>

<script>
export default {
  name: 'ProWave',
  data() {
    return {
      animating: false
    }
  },
  mounted() {
    this.animating = true
  },
  methods: {
    end() {
      this.animating = false
      this.$emit('end')
    }
  }
}
</script>

<style lang="less" scoped>
.pro-ripple-enter-active {
  transition: opacity, transform 0.8s cubic-bezier(1, 0.5, 0.8, 1);
}

.pro-ripple-enter-to {
  opacity: 0.26 !important;
  transform: scale(2) translateZ(0) !important;
}

.pro-ripple-enter-from,
.pro-ripple-leave-to {
  opacity: 0 !important;
}
</style>
使用组件
使用涟漪组件:
<template>
  <div class="pro-list__item">
    <ProRipple>
      <div class="pro-list__item-content">
         <slot></slot>
      </div>
    </ProRipple>
  </div>
</template>

<script setup>
import { defineProps, defineOptions } from 'vue'
import ProRipple from '@/components/pro-ripple/index.vue'

defineOptions({
  name: 'ProListItem'
})

defineProps({
  title: String
})
</script>

<style scoped lang="less">
.pro-list__item {
  width: 100%;

  .pro-list__item-content {
    min-height: 40px;
  }

  /deep/.pro-ripple-wave {
    color: #666;
  }
}
</style>总结其实咱们能分析对逻辑实现起来并不算太困难,源码地址pro-ripple。 感谢大家的支持与喜欢,欢迎点赞、关注、收藏