HTTP代理与Nginx
在做
接口联调调用目标服务器的时候由于同源策略的问题,这个时候呢就会发生跨域了, 解决跨域的常见方式有代理、jsonp、cors等等方式。 vue代理是使用node-http-proxy和http-proxy-middleware俩插件实现http代理服务的, 咱们接下来就自己实现一个简易的node代理服务器,和对nginx的介绍。
node 实现代理服务器
使用
nodejs实现一个简易的代理服务器。
第一步搭建node服务
搭建
node服务, 代码如下:
const http = require("http");
const server = http.createServer();

server.on('request',(req, res) => {
  res.end("hello world");
});


server.listen(3000,() => {
  console.log("http running port: 3000 !!!!");
});
启动node程序,可以看出已经运行成功:
$ node src/index.js
http running port: 3000 !!!!
第二步实现简易代理
实现简易代理,如下:
const http = require("http");
const server = http.createServer();

server.on('request',(request, response) => {

  const options = {
    host: 'www.baidu.com', // 这里是代理服务器
    port: 80, // 这里是代理服务器端口
    path: request.url,
    method: request.method
  };

  http.request(options, (res) => {
    res.pipe(response);
  }).end();
});


server.listen(3000,() => {
  console.log("http running port: 3000 !!!!");
});运行访问http://localhost:3000/ 会看到百度的界面 说明咱们代理成功了。
node 代理总结
其实
node代理就是利用服务器请求服务器不存在有跨域问题,做的就是接受客户端请求的数据转发给目标服务器去,然后拿到目标服务器返回的数据,在返回给客户端做请求响应。
nginx
Nginx (engine x)是一个高性能的HTTP和反向代理web服务器。 简单说下他常用的作用吧。 1、反向代理; 2、负载均衡; 3、搭建文件服务器。 咱们就从这三点说说nginx;
下载Nginx
windown下直接去官网下载 nginx官网下载 选择Stable稳定版本,下载后解压点击nginx.exe及运行成功,测试可以访问http://localhost:80里可以看到Welcome to nginx!的界面,就代表下载成功了。mac下大家按照下面文章去操作即可,MAC下安装nginx;
反向代理
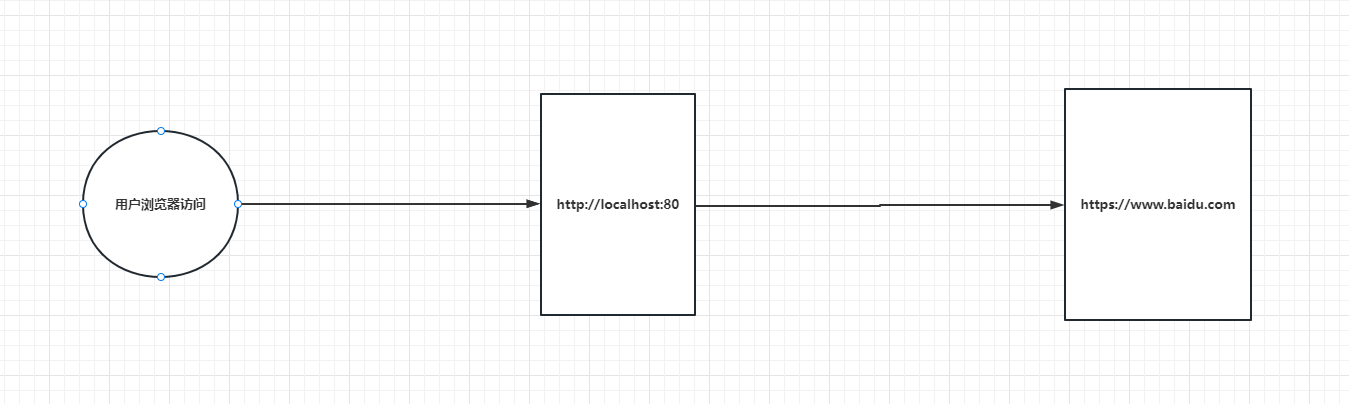
什么是反向代理?假如咱们做个代理用户访问
http://localhost:80给他代理的https://www.baidu.com;如下图所示:
打开咱们安装nginx的文件目录,我的是在D:\Nginx\nginx-1.22.1\nginx-1.22.1找到conf下的nginx.conf打开:
- 使用
proxy_pass代理到https://www.baidu.com/;
location / {
  root   html;
  index  index.html index.htm;
}

; 把上面的部分改成下面的

location / {
  proxy_pass https://www.baidu.com/;
}然后重启nginx:
- 在当前nginx目录
cmd中执行start nginx代表启动ngxin; - 在当前nginx目录
cmd中执行nginx.exe -s stop、nginx.exe -s quit, stop是快速停止nginx,可能并不保存相关信息;quit是完整有序的停止nginx,并保存相关信息。 - 在当前nginx目录
cmd中执行nginx.exe -s reload, 当配置信息修改,需要重新载入这些配置时使用此命令。 - 在当前nginx目录
cmd中执行nginx.exe -s reopen, 重新打开日志文件。 - 在当前nginx目录
cmd中执行nginx -v, 查看Nginx版本;
执行完重启在访问http://localhost:80 就能看到https://www.baidu.com/的界面了。
简单说下server模块
server说明
http {
  ; sever模块可以是多个,如下监听localhost:90端口, listen 是端口, server_name是域名、ip
    server {
      listen       80;
      server_name  localhost;

      location / {
        proxy_pass https://www.baidu.com/;
      }
    }

    server {
      listen       90;
      server_name  localhost;

      location / {
        proxy_pass https://juejin.cn/;
      }
    }
}- 重启下
nginx访问http:localhost:90端口 会帮咱们转发到https://juejin.cn/,就能看到界面了;
可以针对某一个路径进行转发 如下:
server {
  listen       80;
  server_name  localhost;

  location / {
    proxy_pass https://www.baidu.com/;
  }

  location /api/v1 {
    proxy_pass http://localhost:3000/;
  }
}
咱们启动下本地node 服务
const http = require("http");
const server = http.createServer();

server.on('request',(request, response) => {
  response.end('hello word!!!')
});


server.listen(3000,() => {
  console.log("http running port: 3000 !!!!");
});重启下nginx
就能看到访问http://localhost:80/api/v1到http://localhost:3000/界面的hello word!!!了。
nginx 全局变量
| 变量 | 含义 |
|---|---|
| $args | 这个变量等于请求行中的参数,同$query_string |
| $content_length | 请求头中的Content-length字段。 |
| $content_type | 请求头中的Content-Type字段。 |
| $document_root | 当前请求在root指令中指定的值。 |
| $host | 请求主机头字段,否则为服务器名称。 |
| $http_user_agent | 客户端agent信息 |
| $http_cookie | 客户端cookie信息 |
| $limit_rate | 这个变量可以限制连接速率。 |
| $request_method | 客户端请求的动作,通常为GET或POST。 |
| $remote_addr | 客户端的IP地址。 |
| $remote_port | 客户端的端口。 |
| $remote_user | 已经经过Auth Basic Module验证的用户名。 |
| $request_filename | 当前请求的文件路径,由root或alias指令与URI请求生成。 |
| $scheme | HTTP方法(如http,https)。 |
| $server_protocol | 请求使用的协议,通常是HTTP/1.0或HTTP/1.1。 |
| $server_addr | 服务器地址,在完成一次系统调用后可以确定这个值。 |
| $server_name | 服务器名称。 |
| $server_port | 请求到达服务器的端口号。 |
| $request_uri | 包含请求参数的原始URI,不包含主机名,如”/he/bar?arg=123”。 |
| $uri | 不带请求参数的当前URI,$uri不包含主机名,如”/he/bar.html”。 |
| $document_uri | 与$uri相同。 |
rewrite
nginx重定向 本文只介绍基本如何使用,详情可以去 w3cschool;
- last 相当于Apache里的[L]标记,表示完成rewrite,不再匹配后面的规则
- break 与last类似
- redirect 返回302临时重定向
- permanent 返回301永久重定向
使用如下:
location /test/v1 {
  rewrite ^/(.*)([^/])$ http://$host/api/v1/ redirect;
}
重启nginx 访问http://localhost:80/test/v1/ 就会给我重定向到http://localhost/api/v1/去了
alias和root区别
alias和root的区别是什么呢?root与alias主要区别在于nginx如何解释location后面的uri,这会使两者分别以不同的方式将请求映射到服务器文件上。
alias是一个目录别名的定义(仅能用于location上下文),root则是最上层目录的定义。
如下: 访问http://localhost:80/image/123.png 将会返回服务器上/www/data01/image/123.png文件
location ^~ /image/ {
  root /www/data01;
}
如下: 访问http://localhost:80/image/123.png 将会返回服务器上/www/data01/image/123.png文件
location ^~ /image/ {
  root /www/data01;
}
如下: 访问http://localhost:80/image/123.png 将会返回服务器上/www/data01/123.png文件
location ^~ /image/ {
  alias /www/data01;
}
try_files 和 index
try_files其作用是按顺序检查文件是否存在,返回第一个找到的文件或文件夹(结尾加斜线表示为文件夹),如果所有的文件或文件夹都找不到,会进行一个内部重定向到最后一个参数。
$uri: 不带请求参数的当前URI,$uri不包含主机名,如”/he/bar.html” 例如:try_files $uri $uri/ /index?q=$uri&$args
location / {
  try_files $uri $uri/ /404.html;
}输入http:localhost:80/route/home, 就会先去找/route/home文件 再去找/route/home文件夹,前面都找不到就会找/404.html,多用来部署应用没有路由的时候兜底操作。
index
下面的例子中,如果你使用
example.org或www.example.org直接发起请求,那么首先会访问到“/”的location,结合root与index指令,会先判断/data/www/index.html是否存在,如果不,则接着查看/data/www/index.php ,如果存在,则使用/index.php发起内部重定向,就像从客户端再一次发起请求一样,Nginx会再一次搜索location,毫无疑问匹配到第二个~ .php$,从而访问到/data/www/test/index.php。
server {
  listen 80;
  server_name example.org www.example.org;

  location / {
    root /data/www;
    index index.html index.php;
  }

  location ~ \.php$ {
    root /data/www/test;
  }
}
include
主配置文件
nginx.conf中指定包含其他扩展配置文件,从而简化nginx主配置文件,实现多个站点功能,就是重外面引入.conf文件,类似于模块化得功能,支持正则匹配,如下:;
http {
  ; 表示引入了/home/data01/nginx/conf/extra/ 所有带conf文件后缀得文件。 跟再该下写一样
  include /home/data01/nginx/conf/extra/*.conf;
}
搭建文件服务器
使用nginx 搭建一个文件服务器
主要配置参数是:
- 显示目录 autoindex on;
- 显示文件大小 autoindex_exact_size on;
- 显示文件时间 autoindex_localtime on;
- charset utf-8; 解决中文乱码(加上后中文内容不乱码,会发现中文文件名乱码);window下要设置下字符集:控制面板 -> 时钟和区域 -> 区域,弹出区域对话框。在管理选项卡中找到非 Unicode 程序的语言,点击更改系统区域设置,勾选Beta 版:使用 Unicode UTF-8 提供全球语言支持(U)。然后重启
Nginx配置如下:
server {
  listen 91;
  server_name localhost;
  root  D:/new-work/;  # 本地文件路径

  location / {
    autoindex on; # 显示目录
    autoindex_exact_size on;  # 显示文件大小
    autoindex_localtime on; # 显示文件时间
    charset utf-8; # 解决中文乱码
  }
}
负载均衡
负载均衡 什么是负载均衡呢?他解决了什么问题呢?
- 什么是负载均衡
简单说:负载均衡实际上就是将大量请求进行分布式处理的策略。:
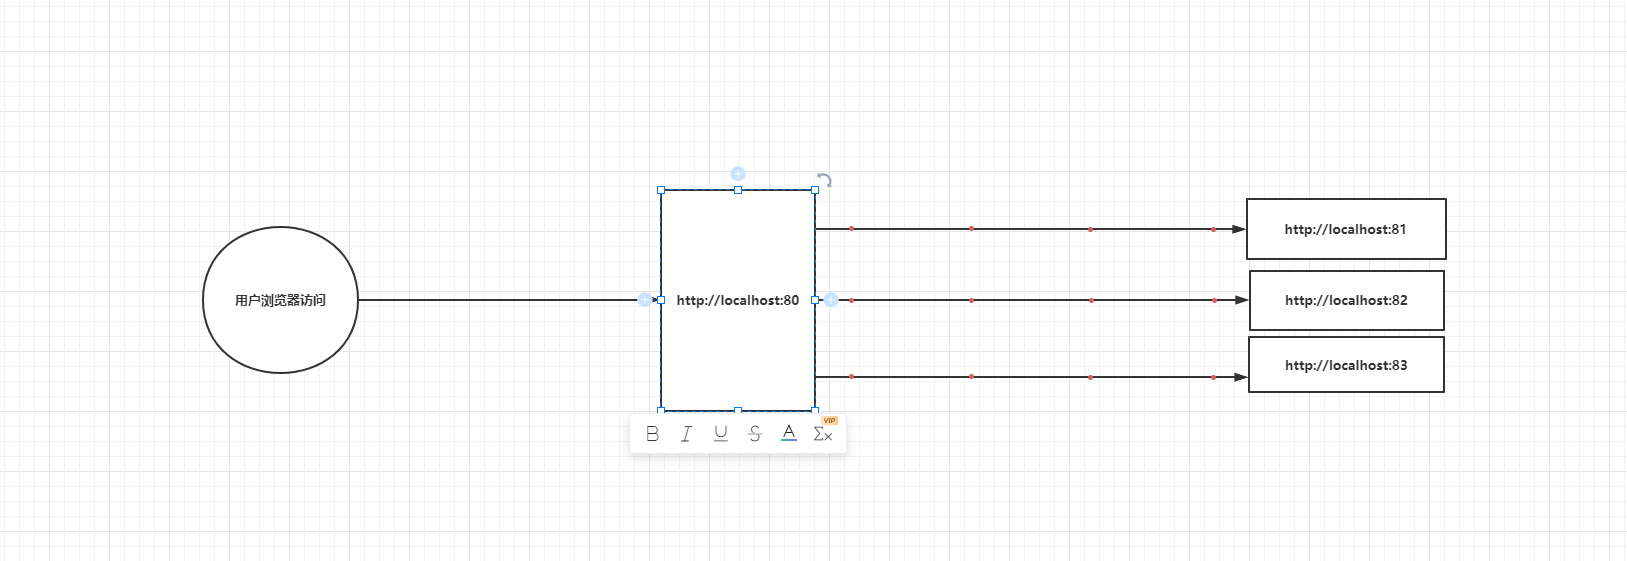
- 就是用户访问一个IP地址或者域名了 我是给他们分别转到多台服务去的,减轻了一台服务器的压力,当然我们还可以对这些机器做一些压力的分配, 如下图 比如默认访问
localhost:8010次,这10次我是可以分配到815次,821次,834次的。
- 解决了什么呢?
- 就是上面说的解决了再大用户量的时候一台机器压力;
- 咱们再上线发布新版本,咱们可以把某一台机器停了,部署这台机器。让用户无感知部署服务。
负载均衡策略
负载均衡的几种常用方式
- 1、 轮询(默认)
每个请求按时间顺序逐一分配到不同的后端服务器,如果后端服务器挂掉,能自动不在对该服务请求。
upstream testserver {
  server localhost:81;
  server localhost:82;
  server localhost:83;
}

server {
  listen       80;
  server_name  localhost;
  location / {
    proxy_pass  http://testserver;
  }
}- 2、2、weight 指定访问正比
指定轮询几率,weight和访问比率成正比,用于后端服务器性能不一样的场景
upstream testserver {
  server localhost:81 weight=5;
  server localhost:82 weight=1;
  server localhost:83 weight=4;
}- 3、ip_hash
每个请求按访问ip的hash结果分配,这样每个访客固定访问一个服务器,可以解决
session的问题。
upstream testserver {
  ip_hash;
  server localhost:81;
  server localhost:82;
  server localhost:83;
}
p_hash当需要去掉某一台的时候,不要直接去除,否则可能造成大量的session失效,因为hash结果不对了。可以使用down的方式解决。当然在业务量小的时候修改也是完全可以的。
upstream testserver {
  ip_hash;
  server localhost:81 down;
  server localhost:82;
  server localhost:83;
}
ip_hash新增一台机器的时候,也会造成大量的session失效,所以最好在业务量很小的时候进行。
- 4 fair(第三方)
根据后台响应时间来分发请求,响应时间短的分发的请求多。比
weight、ip_hash更加智能的负载均衡算法,Nginx本身不支持fair,如果需要这种调度算法,则必须安装upstream_fair模块。
upstream testserver {
  fair;
  server localhost:81;
  server localhost:82;
  server localhost:83;
}