brush 扩展
TIP
相信大家经过前端得bruch和zoom篇对d3js有了一个崭新得认识,那么如果把zoom和brush放在一起要怎么用呢?或者大家再用得时候遇到过什么问题呢? 再或者上篇说到得怎么实现一个自己得brush呢? 本篇就一块实现下这些功能
结合brush和zoom使用
TIP
就不废话了,如果没看之前得文章得可以往前翻翻,我直接把两篇文章得代码合并了。 为了代码减少写提高大家的阅读这里只合并zoom的画布鼠标拖动、平移、缩放,如果对按钮控制缩放、和居中画布等功能可以关注前面的文章。
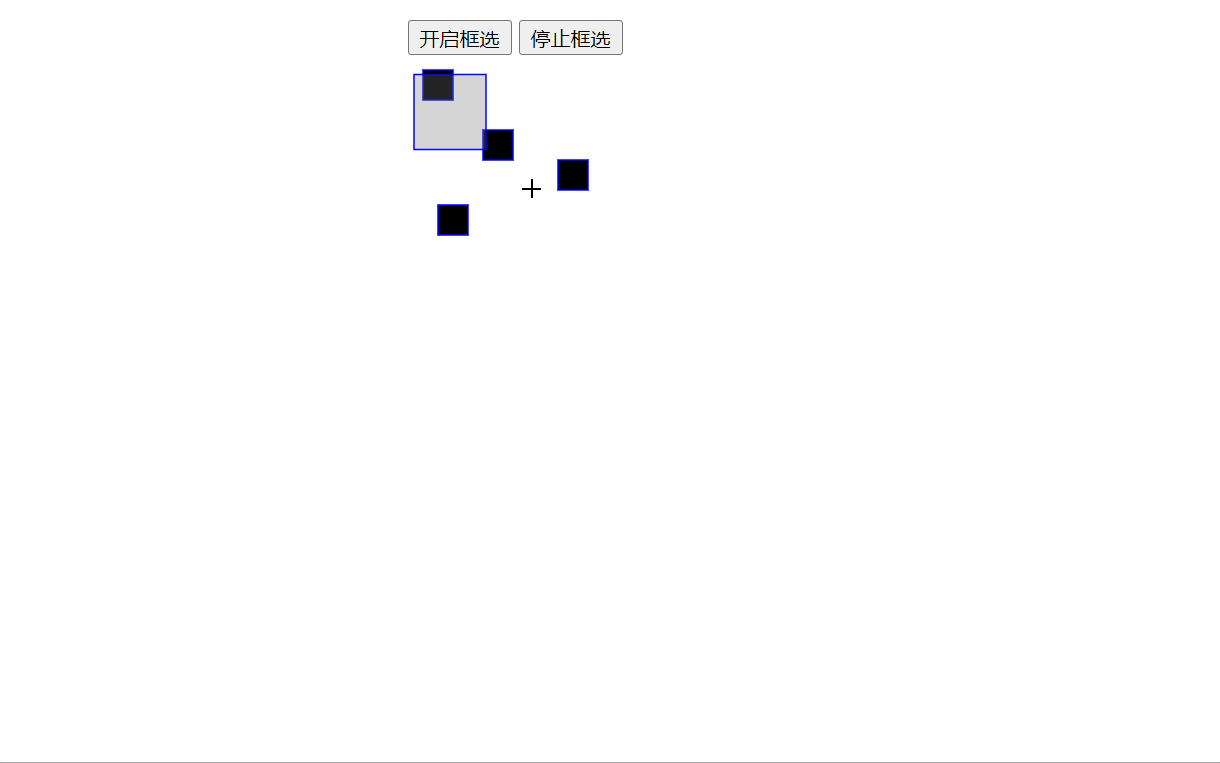
效果图:  code
code
html
<!DOCTYPE html>
<html lang="en">

<head>
  <meta charset="UTF-8">
  <meta http-equiv="X-UA-Compatible" content="IE=edge">
  <meta name="viewport" content="width=device-width, initial-scale=1.0">
  <title>Document</title>
  <style>
    #container {
      width: 500px;
      margin: 50px auto 0;
    }
  </style>
</head>

<body>
  <div id="container">
    <button onclick="startBrush()">开启框选</button>
    <button onclick="stopBrush()">停止框选</button>
  </div>
</body>

</html>
<script src="https://d3js.org/d3.v5.min.js"></script>

<script>
  let brushGroup = null;
  const selected = [];
  let transform = {
    x: 0,
    y: 0,
    k: 1,
  };

  let zoom = null;
  const zoomMin = 0.3;
  const zoomMax = 5;
  const width = 500;
  const height = 500;

  const svg = d3.select('#container')
    .append('svg')
    .attr('width', width)
    .attr('height', width);

  const container = svg.append('g')
    .attr(
      'transform',
      `translate(${transform.x},${transform.y} ) scale(${transform.k})`,
    );

  const data = [
    { id: 1, fill: 'black', x: 10, y: 10 },
    { id: 2, fill: 'black', x: 50, y: 50 },
    { id: 3, fill: 'black', x: 100, y: 70 },
    { id: 4, fill: 'black', x: 20, y: 100 }
  ];

  draw(); // 绘制
  bindZoom(); // 绘制
  function draw() {
    const update = container.selectAll('rect')
      .data(data, d => d.id);
    //修改层
    update.attr('x', (d, idx) => d.x)
      .attr('y', (d, idx) => d.y)
      .attr('fill', (d) => d.fill)

    //渲染层
    const enter = update.enter();

    //删除层
    const exit = update.exit();

    enter.append('rect')
      .attr('width', 20)
      .attr('height', 20)
      .attr('id', d => d.id)
      .attr('x', (d, idx) => d.x)
      .attr('y', (d, idx) => d.y)
      .attr('fill', (d) => d.fill)
      .attr('stroke', 'blue')
      .attr('strokeWidth', 1)

    exit.remove()
  }


  function startBrush() { // 开始框选
    brushGroup = svg.append('g').attr('class', 'brush')
      .call(d3.brush().on('end', () => {
        // brush range
        const [minX, minY] = d3.event.selection[0] || [];
        const [maxX, maxY] = d3.event.selection[1] || [];
        console.log(minX, minY, 'minX, minY', maxX, maxY, 'maxX, maxY')

        data.forEach(({ x, y, id }) => {
          if (x >= minX && x <= maxX && y >= minY && y <= maxY) {
            selected.push(id);
          }
        })

        console.log(selected, 'selected...')
        updateColor();
        stopBrush();
      }))
  };


  function stopBrush() { // 关闭框选
    if (typeof brushGroup?.remove === 'function') {
      brushGroup.remove();
      brushGroup = null;
    }
  };


  function updateColor() { // 更新color
    data.forEach((item) => {
      if (selected.includes(item.id)) {
        item.fill = 'red';
      }
    });
    draw();
  };


  function bindZoom() { // 设置zoom
    zoom = d3.zoom()
      .scaleExtent([zoomMin, zoomMax])
      .on('zoom', function () {
        transform = d3.zoomTransform(this);
        container.attr('transform', transform);
        console.log(transform, 'transform...')
      })
    svg.call(zoom).on('dblclick.zoom', null);
  };

  function stopZoom() {
    svg.on('mousedown.zoom', null);
    svg.on('mousemove.zoom', null);
    svg.on('dblclick.zoom', null);
    svg.on('touchstart.zoom', null);
  }

</script>
解决通过zoom后brush影响框选算法问题
TIP
通过以上代码可以看到brush和zoom都生效了, 问题就是如果缩放后再框选会发现框选的范围计算不准确了? 框选范围的代码段如下(不理解算法的可以去看下框选文章)
js
if (x >= minX && x <= maxX && y >= minY && y <= maxY) {
    selected.push(id);
  }
TIP
问题就是我画布放大、缩小了,但是我的坐标还是原来的坐标那用以上算法指定会不准确的!!!那就把坐标再重新计算下!!
计算zoom后的坐标算法就是使用原始点的x乘transform的k,再加上transform的x, 原始点的y同理,这样就能得到经过zoom后点的坐标了。然后使用转换后的x,y再去经过brush的算法就对了
js
function transformZoomBy([x, y] = [], trans) { //转化成zoom后的坐标(x * trans.k + trans.x)
    return {
      transformX: (x * trans.k) + trans.x,
      transformY: (y * trans.k) + trans.y,
    }
  };

  function startBrush() { // 开始框选
    brushGroup = svg.append('g').attr('class', 'brush')
      .call(d3.brush().on('end', () => {
        // brush range
        const [minX, minY] = d3.event.selection[0] || [];
        const [maxX, maxY] = d3.event.selection[1] || [];
        console.log(minX, minY, 'minX, minY', maxX, maxY, 'maxX, maxY')

        data.forEach(({ x, y, id }) => {
          const { transformX, transformY } = transformZoomBy([x, y], transform); // 转换成zoom后的x,y
          if (transformX >= minX && transformX <= maxX && transformY >= minY && transformY <= maxY) { // 算法不变
            selected.push(id);
          }
        })

        console.log(selected, 'selected...')
        updateColor();
        stopBrush();
      }))
  };
效果图:
不使用d3.brush, 自己写一个brush
TIP
自己实现一个brush要怎么做呢?
思路分析:
- 使用
svg的rect根据用的的鼠标框选绘制出一个矩形 - 需要获取到
rect的四个点的坐标(左上角、右下角) - 需要根据坐标计算小方块是否被框选到(需要考虑用户是从上往下框选、或者是从下往上框选)
接下来咱们准备改造咱们的
startBrush函数
js
// 主要改造startbrush, 其他代码不动, 改动如下
function startBrush(el) { // 开始框选
    stopZoom(); //先停止zoom
    svg.attr('cursor', 'crosshair'); // 改变鼠标手势

    brushGroup = svg.append('g') // 用来停止brush
      .attr('class', 'brush');

    svg.on('mousedown', function () {// 绑定鼠标摁下事件(开始绘制框选)
      const eventDown = d3.event; // 使用d3.event 获取到event事件

      const x1 = eventDown.offsetX; // 开始的x
      const y1 = eventDown.offsetY; // 开始的y

      const rect = brushGroup.append('rect') // 绘制一个没有长度的rect
        .attr('width', 0)
        .attr('height', 0)
        .attr('x', 0)
        .attr('y', 0)
        .attr('fill', 'rgba(119, 119, 119, 0.3)')
        .attr('stroke', 'blue')
        .attr('strokeWidth', 1)

      svg.on('mousemove', function () { // 鼠标move(根据move绘制框选)
        const eventMove = d3.event; // 使用d3.event 获取到event事件
        const x2 = eventMove.offsetX;
        const y2 = eventMove.offsetY;

        const rectWidth = x2 - x1;
        const rectHeight = y2 - y1;

        rect.attr('width', rectWidth)
          .attr('height', rectHeight)
          .attr('x', x1)
          .attr('y', y1);
      });

      svg.on('mouseup', function () { // 鼠标up (完成绘制框选)
        const eventUp = d3.event; // 使用d3.event 获取到event事件

        const x2 = eventUp.offsetX;
        const y2 = eventUp.offsetY;

        svg.on('mouseup', null); // 统一解除绑定
        svg.on('mousemove', null);
        svg.on('mousedown', null);
        svg.attr('cursor', ''); // 改变鼠标手势
        // 咱们其实是有x1、y1 && x2、y2的; 这个时候自需要经过咱们之前的算法计算下就能得到咱们框选中了那些小方块了.

        data.forEach(({ x, y, id }) => {
          // 之前的判断逻辑不变
          const { transformX, transformY } = transformZoomBy([x, y], transform);

          if (x1 < x2) { // 从下网上框选
            if (transformX >= x1 & transformX <= x2 & transformY >= y1 & transformY <= y2) {
              selected.push(id);
            }

          } else { // 从下网上框选
            if (transformX >= x2 & transformX <= x1 & transformY >= y2 & transformY <= y1) {
              selected.push(id);
            }
          }
        })

        stopBrush(); // 取消框选;
        bindZoom(); // 重新绑定zoom;
        updateColor(); // 更改选中的颜色;
      });
    });
  };
源码(1、d3.brush; 2、自定义brush)
d3.brush源码
html
<!DOCTYPE html>
<html lang="en">

<head>
  <meta charset="UTF-8">
  <meta http-equiv="X-UA-Compatible" content="IE=edge">
  <meta name="viewport" content="width=device-width, initial-scale=1.0">
  <title>Document</title>
  <style>
    #container {
      width: 500px;
      margin: 50px auto 0;
    }
  </style>
</head>

<body>
  <div id="container">
    <button onclick="startBrush()">开启框选</button>
    <button onclick="stopBrush()">停止框选</button>
  </div>
</body>

</html>
<script src="https://d3js.org/d3.v5.min.js"></script>

<script>
  let brushGroup = null;
  const selected = [];
  let transform = {
    x: 0,
    y: 0,
    k: 1,
  };

  let zoom = null;
  const zoomMin = 0.3;
  const zoomMax = 5;
  const width = 500;
  const height = 500;

  const svg = d3.select('#container')
    .append('svg')
    .attr('width', width)
    .attr('height', width);

  const container = svg.append('g')
    .attr(
      'transform',
      `translate(${transform.x},${transform.y} ) scale(${transform.k})`,
    );

  const data = [
    { id: 1, fill: 'black', x: 10, y: 10 },
    { id: 2, fill: 'black', x: 50, y: 50 },
    { id: 3, fill: 'black', x: 100, y: 70 },
    { id: 4, fill: 'black', x: 20, y: 100 }
  ];

  draw(); // 绘制
  bindZoom(); // 绘制
  function draw() {
    const update = container.selectAll('rect')
      .data(data, d => d.id);
    //修改层
    update.attr('x', (d, idx) => d.x)
      .attr('y', (d, idx) => d.y)
      .attr('fill', (d) => d.fill)

    //渲染层
    const enter = update.enter();

    //删除层
    const exit = update.exit();

    enter.append('rect')
      .attr('width', 20)
      .attr('height', 20)
      .attr('id', d => d.id)
      .attr('x', (d, idx) => d.x)
      .attr('y', (d, idx) => d.y)
      .attr('fill', (d) => d.fill)
      .attr('stroke', 'blue')
      .attr('strokeWidth', 1)

    exit.remove()
  }


  function transformZoomBy([x, y] = [], trans) { //转化成zoom后的坐标
    return {
      transformX: (x * trans.k) + trans.x,
      transformY: (y * trans.k) + trans.y,
    }
  };

  function startBrush() { // 开始框选
    brushGroup = svg.append('g').attr('class', 'brush')
      .call(d3.brush().on('end', () => {
        // brush range
        const [minX, minY] = d3.event.selection[0] || [];
        const [maxX, maxY] = d3.event.selection[1] || [];
        console.log(minX, minY, 'minX, minY', maxX, maxY, 'maxX, maxY')

        data.forEach(({ x, y, id }) => {
          const { transformX, transformY } = transformZoomBy([x, y], transform);
          if (transformX >= minX && transformX <= maxX && transformY >= minY && transformY <= maxY) {
            selected.push(id);
          }
        })

        console.log(selected, 'selected...')
        updateColor();
        stopBrush();
      }))
  };


  function stopBrush() { // 关闭框选
    if (typeof brushGroup?.remove === 'function') {
      brushGroup.remove();
      brushGroup = null;
    }
  };


  function updateColor() { // 更新color
    data.forEach((item) => {
      if (selected.includes(item.id)) {
        item.fill = 'red';
      }
    });
    draw();
  };


  function bindZoom() { // 设置zoom
    zoom = d3.zoom()
      .scaleExtent([zoomMin, zoomMax])
      .on('zoom', function () {
        transform = d3.zoomTransform(this);
        container.attr('transform', transform);
        console.log(transform, 'transform...')
      })
    svg.call(zoom).on('dblclick.zoom', null);
  };

  function stopZoom() {
    svg.on('mousedown.zoom', null);
    svg.on('mousemove.zoom', null);
    svg.on('dblclick.zoom', null);
    svg.on('touchstart.zoom', null);
  }


</script>- 自定义
brush
html
<!DOCTYPE html>
<html lang="en">

<head>
  <meta charset="UTF-8">
  <meta http-equiv="X-UA-Compatible" content="IE=edge">
  <meta name="viewport" content="width=device-width, initial-scale=1.0">
  <title>Document</title>
  <style>
    #container {
      width: 500px;
      margin: 50px auto 0;
    }
  </style>
</head>

<body>
  <div id="container">
    <button onclick="startBrush()">开启框选</button>
    <button onclick="stopBrush()">停止框选</button>
  </div>
</body>

</html>
<script src="https://d3js.org/d3.v5.min.js"></script>

<script>
  let brushGroup = null;
  const selected = [];
  let transform = {
    x: 0,
    y: 0,
    k: 1,
  };

  let zoom = null;
  const zoomMin = 0.3;
  const zoomMax = 5;
  const width = 500;
  const height = 500;

  const svg = d3.select('#container')
    .append('svg')
    .attr('width', width)
    .attr('height', width);

  const container = svg.append('g')
    .attr(
      'transform',
      `translate(${transform.x},${transform.y} ) scale(${transform.k})`,
    );

  const data = [
    { id: 1, fill: 'black', x: 10, y: 10 },
    { id: 2, fill: 'black', x: 50, y: 50 },
    { id: 3, fill: 'black', x: 100, y: 70 },
    { id: 4, fill: 'black', x: 20, y: 100 }
  ];

  draw(); // 绘制
  bindZoom(); // 绘制
  function draw() {
    const update = container.selectAll('rect')
      .data(data, d => d.id);
    //修改层
    update.attr('x', (d, idx) => d.x)
      .attr('y', (d, idx) => d.y)
      .attr('fill', (d) => d.fill)

    //渲染层
    const enter = update.enter();

    //删除层
    const exit = update.exit();

    enter.append('rect')
      .attr('width', 20)
      .attr('height', 20)
      .attr('id', d => d.id)
      .attr('x', (d, idx) => d.x)
      .attr('y', (d, idx) => d.y)
      .attr('fill', (d) => d.fill)
      .attr('stroke', 'blue')
      .attr('strokeWidth', 1)

    exit.remove()
  }


  function transformZoomBy([x, y] = [], trans) { //转化成zoom后的坐标
    return {
      transformX: (x * trans.k) + trans.x,
      transformY: (y * trans.k) + trans.y,
    }
  };

  function startBrush(el) { // 开始框选
    stopZoom(); //先停止zoom
    svg.attr('cursor', 'crosshair'); // 改变鼠标手势

    brushGroup = svg.append('g') // 用来停止brush
      .attr('class', 'brush');

    svg.on('mousedown', function () {// 绑定鼠标摁下事件(开始绘制框选)
      const eventDown = d3.event; // 使用d3.event 获取到event事件

      const x1 = eventDown.offsetX; // 开始的x
      const y1 = eventDown.offsetY; // 开始的y

      const rect = brushGroup.append('rect') // 绘制一个没有长度的rect
        .attr('width', 0)
        .attr('height', 0)
        .attr('x', 0)
        .attr('y', 0)
        .attr('fill', 'rgba(119, 119, 119, 0.3)')
        .attr('stroke', 'blue')
        .attr('strokeWidth', 1)

      svg.on('mousemove', function () { // 鼠标move(根据move绘制框选)
        const eventMove = d3.event; // 使用d3.event 获取到event事件
        const x2 = eventMove.offsetX;
        const y2 = eventMove.offsetY;

        const rectWidth = x2 - x1;
        const rectHeight = y2 - y1;

        rect.attr('width', rectWidth)
          .attr('height', rectHeight)
          .attr('x', x1)
          .attr('y', y1);
      });

      svg.on('mouseup', function () { // 鼠标up (完成绘制框选)
        const eventUp = d3.event; // 使用d3.event 获取到event事件

        const x2 = eventUp.offsetX;
        const y2 = eventUp.offsetY;

        svg.on('mouseup', null); // 统一解除绑定
        svg.on('mousemove', null);
        svg.on('mousedown', null);
        svg.attr('cursor', ''); // 改变鼠标手势
        // 咱们其实是有x1、y1 && x2、y2的; 这个时候自需要经过咱们之前的算法计算下就能得到咱们框选中了那些小方块了.

        data.forEach(({ x, y, id }) => {
          // 之前的判断逻辑不变
          const { transformX, transformY } = transformZoomBy([x, y], transform);

          if (x1 < x2) { // 从下网上框选
            if (transformX >= x1 & transformX <= x2 & transformY >= y1 & transformY <= y2) {
              selected.push(id);
            }

          } else { // 从下网上框选
            if (transformX >= x2 & transformX <= x1 & transformY >= y2 & transformY <= y1) {
              selected.push(id);
            }
          }
        })


        stopBrush(); // 取消框选;
        bindZoom(); // 重新绑定zoom;
        updateColor(); // 更改选中的颜色;
      });
    });
  };


  function stopBrush() { // 关闭框选
    if (typeof brushGroup?.remove === 'function') {
      brushGroup.remove();
      brushGroup = null;
    }
  };


  function updateColor() { // 更新color
    data.forEach((item) => {
      if (selected.includes(item.id)) {
        item.fill = 'red';
      }
    });
    draw();
  };


  function bindZoom() { // 设置zoom
    zoom = d3.zoom()
      .scaleExtent([zoomMin, zoomMax])
      .on('zoom', function () {
        transform = d3.zoomTransform(this);
        container.attr('transform', transform);
        console.log(transform, 'transform...')
      })
    svg.call(zoom).on('dblclick.zoom', null);
  };


  function stopZoom() {
    svg.on('mousedown.zoom', null);
    svg.on('mousemove.zoom', null);
    svg.on('dblclick.zoom', null);
    svg.on('touchstart.zoom', null);
  }

</script>
结束语
TIP
经过brush的扩展相信大家对d3js又有了一个全新的认识。